
Showing posts with label Making Things. Show all posts
Showing posts with label Making Things. Show all posts
Sunday, February 14, 2010
Thursday, January 14, 2010
Useful Scraps II
 Despite plenty of chores waiting for me, I chose to make my favourite book a cover on Sunday. It was quite warm that day and thus I didn’t want to do anything too stressful. The book was bought when it was first published back in 2005. So it has a hard cover and a dust jacket making it very hard for me to read without damaging the dust jacket. This is why I prefer books with soft covers because it is easier to protect them by covering each with Contact. I have begun to read this book from cover to cover again for a second time and I now leave the dust jacket sitting in the book case while I am at it but without the dust jacket, I worried that the light blue hard covers might become grubby over time. So, I set out to make it a washable cover. The floral print drill is from my growing pile of fabric scraps and the fabric’s colours turned out to match the book’s covers quite well. Do you think I am happy with how the cover turned out? Well, not really. It does serve its purpose but I think if I do make another one in the future and if I use an outer fabric like drill again, I will make sure that the inner fabric (lining) is made of something lighter to make the turning easier. I am not too satisfied with how the corners turned out and I am pretty sure that is because there is too much bulk within for each corner to turn out nicely. Yeah, I know that I can be fussy.
-
The book’s new jacket is also useful in hiding its identity. For fear of being judged, I never felt comfortable reading this book in public like when I am stuck with nothing to look at inside a super packed tram. This doesn’t happen very often because I try to avoid taking public transport but it does. One word in the book’s long title is bugging me. I know for a fact that another word (also starts with the letter ‘G’) with a similar meaning to this word bugs other people out there.
Thursday, January 7, 2010
Useful Scraps
 Here is the coin pouch that I made for M when he was away on Tuesday. It is similar to one that I made for myself recently. It is another chance for me to practise making a pouch with lining. Because I wasn’t quite sure how to repeat it, I didn’t spend much time altering the overall design. The pocket at the front is deeper this time and a key ring is also included. It is hidden inside the pocket.
Other than the zipper, this coin pouch is made entirely with scraps, which includes the interfacing I ironed onto the wrong sides of the fabric pieces. Even the key ring is recycled from the old worn out coin pouch heading for retirement. I also made the pattern pieces using a cereal box so they can be reused when I make another one in the future.
M loves it!
Thursday, December 31, 2009
Reuseable Christmas Hampers/Stockings
 M and I have managed to continue our new tradition that we started for Christmas 08 by buying his family gift cards and food hampers again this year. The idea was to make Christmas less commercialized or to at least make it look less commercialized, in preparation for something that might or might not happen in the near future. Unlike last year, M was all for it this time round.
Inspired by those bloggers who make Christmas gifts by hand, and increasingly wishing to minimize our impact on Planet Earth in some little ways, I made three Christmas stockings that can be filled with food and gift cards year after year.This meant that we didn't have to wrap the food up in paper or cellophane. I have noticed in the past that the paper and cellophane was almost never reused, even though they both make great material for children to reuse in their art and craft activities. This year we didn't buy from Suga or Haigh's. We stuffed the stockings with a gift card each, organic tea from Oxfam, mini soft toys from IKEA, boxes of Walkers shortbread, Cadbury chocolates for the kids and Lindt chocolates for the adults. There was also an extra block of Fair Trade dark chocolate from Oxfam for M's Dad. We are aiming to fill the stockings with more ethical products next Christmas.
Making the reuseable stockings doesn't mean that we no longer use wrapping paper. We still have at least half a roll of wrapping paper that I will continue to use until it runs out. After that, I will start making individual drawstring bags to 'wrap up' birthday pressies. They can be used over and over. At this stage, I am not sure if I will make bags of different sizes to hold different sized pressies or make each family member a personalized bag. What do you think? I am sure that M would prefer the second option but that would mean that we will have to shop for pressies that will fit in the bag! That is kind of restrictive!
Monday, December 21, 2009
Oh No! Posties Going On Strike!
 I am running very late with Christmas preparations this year. I had to stay up till around 3 am to finish making the Christmas cards. M took them to Australia Post on his way to work. And then I learned from the news that the Posties are going to walk off their job at midnight! I told my Mum on Saturday that my Christmas card will arrive late this year because I have been busy with other things. She didn't mind. My family do not celebrate Christmas in a commercialized way and they don't feel stung if Christmas cards arrive late. To us, its the thought that counts and any thoughts can also be communicated via the phone. My Mum even suggested that I should have emailed the card. Well, that is a 'Green' idea but my cards are handmade with lots of Love. We hope that the recipients enjoy receiving them as much as us putting them together.
Friday, December 11, 2009
The Skinny Fly Annoying the Bad Driver
I did a bit of sewing in October and November. I made a simple coin pouch to replace my kawaii Japanese coin pouch at the end of October. The Japanese coin pouch was one of the last things I bought from Daimaru before it closed its doors. It is sad to see it heading for retirement. The new pouch that I made is lined. It took me a long time to figure out how to make a lined bag. Yes, I am that annoying type of customer at Borders who studies the insides of the cutesy lined bags and pencil pouches to figure out the mystery construction.
 Ever since I stopped going to sewing lessons yonks ago, I had become less adventurous. Without my teacher’s guidance, I lost confidence in trying to create complicated looking sewing features and chose only projects without them. Towards the end of November, I thought that I ought to challenge myself a bit. The mock fly is something I really wish to perfect. So, I thought I could practice by making someone a pair of shorts. The following are photos of the shorts. My first attempt without my teacher’s help is less than desirable! Oh! I did use a pattern to make them.
 I made the shorts using a small piece of fabric bought so long ago that I couldn’t remember why I bought it in the first place! I ran out of fabric and ended up using some scraps to construct the inside of the pockets. LOL. Can you see what is wrong with the shorts?
 Let’s have a closer look at the mock fly. Can you see what the problem is yet?
 This is the view behind the mock fly. Can you see my mistake yet? Well, there was meant to be a two layered flap for me to overlock around before stitching the mock fly outline through all the layers from the front but my driving was so bad that the overlocker had gobbled up most of the flap as I drove over and over to get things right. In the end, I was left with only a little bit of the flap. Enough only to make a skinny mock fly. LOL
 Here is how wide the outline for the fly should be.
 As can be seen here, I am still quite obsessed with the ‘adjustable waist’ feature. This is an improved design. They are different from the ones on the skirt I made a few months ago. Back in October, I went to ask a few mums about the ‘adjustable waist’ feature on some children’s pants. It is no surprise that quite a few didn’t like it. Other than the discomfort caused by the rubbing of the buttons against the child’s skin, two mothers also mentioned the frustration of losing the ends of the elastic inside the short’s/pant’s casing when the elastic is released accidentally while adjusting it. Now, while I haven’t figure out how to eliminate or decrease the discomfort caused by the buttons as yet, I have decided to hide and sew the elastic ends inside the casing so they can’t run away from any carers trying to dress a growing child.
 Ever since I stopped going to sewing lessons yonks ago, I had become less adventurous. Without my teacher’s guidance, I lost confidence in trying to create complicated looking sewing features and chose only projects without them. Towards the end of November, I thought that I ought to challenge myself a bit. The mock fly is something I really wish to perfect. So, I thought I could practice by making someone a pair of shorts. The following are photos of the shorts. My first attempt without my teacher’s help is less than desirable! Oh! I did use a pattern to make them.
 I made the shorts using a small piece of fabric bought so long ago that I couldn’t remember why I bought it in the first place! I ran out of fabric and ended up using some scraps to construct the inside of the pockets. LOL. Can you see what is wrong with the shorts?
  Let’s have a closer look at the mock fly. Can you see what the problem is yet?
  This is the view behind the mock fly. Can you see my mistake yet? Well, there was meant to be a two layered flap for me to overlock around before stitching the mock fly outline through all the layers from the front but my driving was so bad that the overlocker had gobbled up most of the flap as I drove over and over to get things right. In the end, I was left with only a little bit of the flap. Enough only to make a skinny mock fly. LOL
-
 Here is how wide the outline for the fly should be.
-
 As can be seen here, I am still quite obsessed with the ‘adjustable waist’ feature. This is an improved design. They are different from the ones on the skirt I made a few months ago. Back in October, I went to ask a few mums about the ‘adjustable waist’ feature on some children’s pants. It is no surprise that quite a few didn’t like it. Other than the discomfort caused by the rubbing of the buttons against the child’s skin, two mothers also mentioned the frustration of losing the ends of the elastic inside the short’s/pant’s casing when the elastic is released accidentally while adjusting it. Now, while I haven’t figure out how to eliminate or decrease the discomfort caused by the buttons as yet, I have decided to hide and sew the elastic ends inside the casing so they can’t run away from any carers trying to dress a growing child.
I am not very happy with the outcome of this pair of shorts. The skinny mock fly bothers me. Due to this flaw, I am refusing to give it away as a gift to anyone. We don’t have any children to wear it either. So for now, it has gone to sit among my favourite T-shirts. My next sewing project will be carried out in the next few days. I will blog about them once they are completed. It looks like I won’t have time until after Christmas or the New Year to start practising making mock flies on little shorts again. Although I am unhappy with the results of my first independent attempt, I am adamant to perfect it. I am thinking of altering the pattern to suit my driving. LOL. Imagine altering the roads to suit my driving. LOL. M reckons that he is in no hurry to be my passenger, even if I am given the go ahead to alter all the roads in Melbourne. LOL. He reckons that not only do the roads have to be altered; everyone else will have to stay at home for me to drive since I can’t share. LOL
Wednesday, October 7, 2009
How I Use My TROLIG
Yeah I know very well that I simply can’t have enough of IKEA. I went there on two Sundays in a row in September. I actually went alone on the second trip because Moosh could very well have gone insane if I made him go again. LOL. That was when I bought myself a TROLIG plus a couple of other things. In case if you are wondering what in the world a TROLIG is, it is actually a curtain rod set that requires no drilling because it is spring loaded. And just in case if anyone is as curious as me, I actually went to Google the word and learnt that it meant plausible in English but it could be wrong because people should not believe everything written online. (In that case, people shouldn’t believe a word I have blogged about too. LOL.) M and I have always been curious with the names of IKEA products. They can sound quite funny. If I am not wrong, there used to be a teenager’s desk called BRA!
I have always wanted some kind of cabinet / buffet to store plates, glasses and other serving ware within the dining area but because we live in a tiny pigeon hole with limited space, I am forced to put that dream on hold until we move to a house one day. We have also accumulated other pieces of furniture over the years that we do not wish to just chuck them out yet. One example of such a piece of furniture is this bookcase that I bought when I was at university. It is not a Billy. In fact, it is not even from IKEA but it is made of the same kind of material as those Billy bookcases. One blogger calls this material fake wood. Fake wood or not, we don’t wish to throw it out yet. We had recently placed it in front of the short wall separating the kitchen and the dining area. It has been empty ever since M moved his collection of DVDs that used to be stored there to a new lockable cabinet. Its current location makes it possible for me to use it as a buffet to create more storage room within our tiny kitchen but I was a little worried that the contents may become dusty because this so called ‘buffet’ has no doors. Then I remembered this TROLIG thingy in the 2010 IKEA catalogue. I wondered if I could make a curtain for this bookcase. Out came the measuring tape to see if the TROLIG would fit in between the bookcase’s sides and it fitted apparently. So off we went to IKEA that very Sunday and since it was our first visit after the release of the new catalogue, I insisted that we go through the whole shop to make sure I didn’t miss a single piece of new products. Poor M went along like a gentleman without complaining even when I mentioned my intention to not buy the TROLIG that day because I needed to think a little bit more. LOL. I could see that he was wondering why he was made to spend his Sunday negotiating his way through such a thick crowd to emerge at the other end to buy two jars of Lingonberry jam and a hot dog. LOL. Anyway I made up my mind six days later and went back to IKEA on the following Sunday to buy that TROLIG.
 This is the TROLIG in its packaging.
 This is the fake wood book case with the TROLIG fitted.
 This is my notes on how to construct the curtain. If I am not following a pattern, I have to make notes before I start on a project. Once I have the skeletal framework on paper, I am pretty flexible with any alterations needed along the way. Okay, the fabric I chose is quite childish but that is the only blackish fabric I have in my stash at the moment. And yes, the fabric is from IKEA. I bought it a few months ago.
 This is the end product. It is just a basic curtain but M and I are happy with it.
Note: We are happy with the outcome of this little project. The TROLIG mounted firmly to the inner sides of the bookcase and the rings/clips did their job in hanging the curtain but because the curtain rod is not permanently fixed, it might fall out if a curious hand yanks the curtain forcefully. This is not a problem to us since we do not have any children of our own and we are not likely to have any child visitors ever. How lonely, huh? In the catalogue, the TROLIG is used to fit inside window frames. I just thought I made it clear in case if anyone is interested to do what we did, he/she should consider carefully before making an educated choice.
Friday, June 5, 2009
Show & Tell: Two ‘Extra Large’ Yo-yos

I finally sat down to test-drive the Clover brand “Quick” Yo-Yo Maker the other day. The gadget is indeed a quick and easy way to make nicely shaped yo-yos. I am pretty happy with the results of my first two attempts. There is an example of what the finished product would look like on the packaging and the two that I made are roughly the same size as that. When I stood there at the shop deciding which one to buy, I selected the Extra Large one because it seemed easier to manage at the time. From experience, sewing smaller things tend to be fiddly and I didn’t wish to be frustrated when attempting something new. In the end, I didn’t think that size really mattered because the Yo-Yo Maker makes the whole process so easy. I am however surprised that the finished product really did turn out to be as small as pictured on the packaging. And when I first unfolded the printed instructions, my first impression was, “Gee, I am not going to like this. There are just way too many steps.” It was after closer scrutiny that I realised that I only need to read a quarter of the instructions sheet because the rest are in other European languages. PHEW! The instructions are indeed very detailed. In my opinion, I think that maybe they can summarize it a little to make it less ‘repetitive’. Now that I know how to make yo-yos with this gadget, I am not sure how I could use them in my projects. That’s something to think about.
On another note, the spectators are loud tonight. I not only hear fireworks but I can also hear the cheers of a large crowd from either Etihad Stadium or MCG. I am just too lazy to step outside to find out. May be Richmond is finally defeating whoever they are playing against tonight. LOL.
On another note, the spectators are loud tonight. I not only hear fireworks but I can also hear the cheers of a large crowd from either Etihad Stadium or MCG. I am just too lazy to step outside to find out. May be Richmond is finally defeating whoever they are playing against tonight. LOL.
Thursday, May 28, 2009
Show & Tell: Little Denim Skirt with Petticoat
I just can’t wait to show off this little piece that I nearly finish constructing. There is only one embellishment that I have yet to apply. Can anybody guess what it is? LOL. Since I am not willing to use what I have, it looks like I will have to buy one just for this skirt.
The little skirt is made using a pattern I bought back in April. In case if anyone is interested, the pattern is Burda #9613. Since I relied on a pattern, I obviously didn’t design this piece from scratch; neither did I follow the instructions religiously. A few things were altered for easier construction and aesthetic reasons.
-In the instructions, I was supposed to apply zigzag stitch along the folded lower edge of the ruffle and then trim it. Instead of doing that, I finished that edge with a Rolled Edge Stitch on my overlocker to give it a more professional look.
-I knew very early on that I would be struggling with the way the patch pockets were supposed to be constructed. The fiddly bits would be a definite struggle but my high expectations on how the things I make turn out would certainly do my head in. So to make sure that the shape of each pocket is not compromised, I decided to make lined ones to make doubly sure that the turning of the seam allowances to the other side is as accurate as possible. The end result is not perfect but I am happy with the outcome. Little ‘annoying’ things like this are very important to me. LOL.
-This is meant to be a pull-up skirt with a ¾ elasticated waist but I turned it into one with an adjustable waist just like many commercial children’s garments available these days. Some people like this feature while others totally dislike it because the buttons and elastic rub against the child’s skin causing discomfort.
It can be hard to find some of the things required to make a garment from a store bought pattern. I was unable to find metal rivets again. They are needed to secure the top corners of each pocket but I will have to go without. There is a place in Melbourne where I could have gone to buy the rivets but I think they would only sell to me if I bought in bulk. I only need 6 for this skirt.
This skirt is likely to go to a little girl from M’s side of the family soon. It has been my wish to give home-made items as gifts since I read about other bloggers doing the same thing. I am not very sure how it will be accepted. I will look for a pretty belt, one that has a popular character, to make the skirt more appealing to the recipient. I am not willing to apply an iron-on patch of a popular character on the skirt. If it falls off, it is likely to leave an ugly mark and unlike an iron-on patch, a belt is at least removable. It is also less visible. We had always refrained from buying clothes for any children (over the age of 2) from his side of the family because of the Free Speech policy. I wonder how I would react if the skirt was openly rejected.
I have packed away my sewing machine for now but my overlocker remains on my desk. I am going to take a little break from sewing to spend a few days on Montessori. I also wish to test drive the crafting gadgets I bought in April. After that, I will either make some simple bags or a little double breasted jacket.
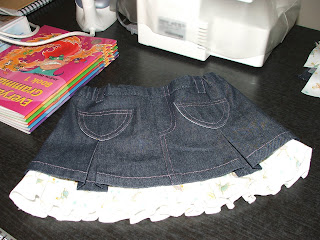 The little denim skirt with petticoat attached.
 The adjustable waist
 The lined patch pockets. (The fingers belong to Moosh.)
Tuesday, April 21, 2009
Completed Finally

Way back in June last year I blogged about making a pouch. I remember promising to blog about it once it was completed. Well, after nearly a year, I have finally completed the project. It took me a few hours to put it all together. I originally planned to make the pouch from scratch by creating the pattern myself, but that didn’t eventuate because I ended up buying some patterns during a sale and one pattern featured this pouch.
The pouch is made to hold my Guinea Pig’s urn and because of that M and I wanted fabrics featuring a theme that is relevant to our charismatic pet. We had wanted a fabric with a vegetable patch print or one with prints of cucumbers or parsley. We looked everywhere and found this carrot one. Our Guinea Pig loved carrots too. After we found the carrot fabric, we had difficulty finding a second fabric. We even had difficulty deciding what colour to buy for the ribbons and once we had settled for green, we were unable to find any grosgrain ribbon in that colour.
The project was on and off for a while until my world came crashing down for a second time in late July when I found out what could have happened to my Guinea Pig’s cremation. That was when it was put on hold indefinitely because I was too distressed to want to spend hours making something for a little friend who may or may not be inside the urn. Things have been finally returning to normal in the last month or two. While I am yet to be totally convinced that he is indeed inside the urn, I felt like I was ready to attempt this project again. So I spent a good few hours making the pouch yesterday. It was fun.
M was happy to see the product when he came home from work. Apparently the first thought that came into his head was: “Cool! She has finally got off her bum and made something beautiful.” Sewing is fun. Now that I have completed this pouch, I am feeling confident again and am ready to start working on the patterns I bought last week.
Saturday, December 13, 2008
Rainy Day Project – Christmas Cards 2008

It has been raining all day today. I like the rain because I want the lawn in the common area to stay green for as long as possible. So, instead of heading to the city, I stayed at home to make this year’s Christmas cards. The cards designated for immediate family members are handmade. As in the past few years, this set features our little Guinea Pig. It will be the last time he ‘plays’ a part in our Christmas cards and his role this time is only minor. The cards are not 100% completed yet. I am hoping that the rain will go away by tomorrow so I can pop into Big W to buy some more stickers. A couple of the cards still need a little extra sprucing up.
Tuesday, June 17, 2008
Pouch Project On Hold
I recently blogged about making a pouch from scratch but now I have decided to put it on hold until after I buy more fabric. I originally decided to use two different fabrics and had already bought them but we have now decided that the second fabric is not a good match to the first one. So, until I find a suitable contrasting fabric, this project can go no further but I definitely will blog about it once the pouch is made. We have to get the combinations right because this pouch will have an important job to do.
Sunday, June 15, 2008
Slow Brain
I am in the process of making a simple pouch from scratch. By that I mean making it by creating the pattern myself instead of buying one from a craft shop. First I wanted a pouch that opens up to a circle but then I saw an octagonal cushion in a pattern book on Friday and thought I could easily make a pouch that opens up to an octagon. As soon as I got my chores done yesterday, I set out to create a pattern. Not long after I started, I toyed with the idea of turning the octagon into a flower shape with 8 petals. I then took a longish break to think about this but it made things worse. It was just impossible to make up my mind. I came away thinking that I might try making a flower shape with only four petals instead. My brain was just so slow. It was probably on sleep mode because of the cold weather. Worse, it might have been slow because of age! Scary! Only a quarter of an octagon was needed to create the two required pattern pieces and it took me unbelievably long to do just that. The pouch is of course not completed yet but I will definitely blog about it once it is ready.
Subscribe to:
Posts (Atom)
